|
Base
* Exterior
This section details the materials needed and process to make the exterior wood base for a joystick.
Materials Needed:
- WOOD- the width is up to you. I recommend 3/4" thick wood though. Home Depot has a variety of wood
ranging from poplar, birch, maple, and oak. These variety are located together in your local Home Depot, and only come in
3/4" thickness, but the width ranges from 1 1/2", 2 1/2", and 3 1/2". The wood type is up to you. The wood not only varies
in color, but in hardness,
and grain patterns. I personally prefer poplar due to it's soft nature. It's soft enough not to splinter too much during
cutting with power tools, but hard enough not to dent. You can also use MDF, but I recommend you stay away from particle
board, as it tends to chip easily near the cuts.
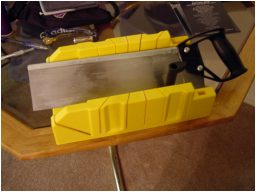 Miter Saw-
You can use a power miter saw, if you have one handy. If not, you can save money by buying a manual version
($5; picture to the right). The miter saw is used to make straight cuts, as well as angle cuts. Miter Saw-
You can use a power miter saw, if you have one handy. If not, you can save money by buying a manual version
($5; picture to the right). The miter saw is used to make straight cuts, as well as angle cuts.
- Wood Glue- This is self explanatory.
- Plexi Glass- This will determine the size of your base. A standard size is 11" x 14" and 1/8" thick.
I usually have the worker
at Home Depot cut this in half to 11" x 7". There are thicker sizes also, but if you are using a non-screwing type pushbutton,
such as the ones include with the Sanwa VF4 set, stick to 1/8" thickness, as the pushbuttons' clamps will not "grab" plexi
that is thicker. Sanwa does offer screwing type pushbuttons like those offered by Happ, if you want a thicker plexi, and
Sanwa pushbuttons. The size of the plexi will determine the size of the base. Slimming down plexi is hard work, and the
base will be built around the plexi for convenience. Ultimately, the size is up to you. Also, you can use a more durable,
but more expensive alternative- Lexan. Lexan is also used for R/C car bodies.
- Sandpaper- Used to shape and smooth the wood. Use a really heavy grit for shaping, and taking off the rough
edge on the cuts. Use smoother sandpaper before spraying on the paint.
- Square- Handy to make sure your base is built correctly.
- Wood Putty- Used to fill imperfections int the wood.
- Paint- I use lacquer, as it dries harder than enamel, but again, it's up to you. Use flat paint for the base/primer.
- Table Saw- This is only needed for fancy angle cuts that go the along the length of the wood.
- 15-Pin plug- These are acquired from a specialty eclectronics store or computer store. For gamers on the West Coast,
Fry's Electronics carry these.
Steps:
 For example's sake, say you cut your plexi to 10"W x 12"L and you have 3/4" thick wood. You can either cut your wood
to (2) 10" long pieces of wood for the width of the base, along with (2) other pieces of 13 1/2"
(accomodates the 2x 3/4" thickness of the wood- so you add 1 1/2") long wood for the length of the
base; which will have the
screws (that later will be used to hold the platform) in the front of the base. Conversely, you may
choose to have (2) 11 1/2" long pieces for the width, and (2) 12" long pieces for the length; which will have the screws on the
side of the base.
For example's sake, say you cut your plexi to 10"W x 12"L and you have 3/4" thick wood. You can either cut your wood
to (2) 10" long pieces of wood for the width of the base, along with (2) other pieces of 13 1/2"
(accomodates the 2x 3/4" thickness of the wood- so you add 1 1/2") long wood for the length of the
base; which will have the
screws (that later will be used to hold the platform) in the front of the base. Conversely, you may
choose to have (2) 11 1/2" long pieces for the width, and (2) 12" long pieces for the length; which will have the screws on the
side of the base.
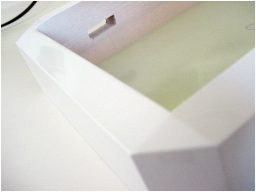
 Build now glue your pieces around the plexi like the diagram to the right, using the plexi as a guide. Use
sandpaper to shorten longer than needed pieces. Building the wood around the plexi ensures it fits during later assembly.
Use a square (shown to the right) to make sure the stick is plum (straight up and down.)
Build now glue your pieces around the plexi like the diagram to the right, using the plexi as a guide. Use
sandpaper to shorten longer than needed pieces. Building the wood around the plexi ensures it fits during later assembly.
Use a square (shown to the right) to make sure the stick is plum (straight up and down.)
- When the glue is dry, if you want to make your stick fancy, it's at this time that you can use a table saw to make
the angled cuts on the top and sides of the base. If you don't have
access to a table saw, use heavy grit sandpaper... REALLY HEAVY GRIT to shape the wood. This takes considerable time and
effort, but is well worth it if you want something to show off.
 Now cut a hole for a 15-pin plug (example yet again, shown to the right) if you
want your stick to have the PCB board (see Electronics section) in a removable box. Skip this
step if you will mount the PCB board inside the base, although drilling any type of hole that will be on the base for the
protrusion of the cord. MAKE SURE TO CONSULT THE NEXT SECTION (INTERIOR), SO THAT THE HOLE YOU DRILL WILL NOT BE COVERED
BY THE INTERNAL STRUCTURE OF THE STICK. Now cut a hole for a 15-pin plug (example yet again, shown to the right) if you
want your stick to have the PCB board (see Electronics section) in a removable box. Skip this
step if you will mount the PCB board inside the base, although drilling any type of hole that will be on the base for the
protrusion of the cord. MAKE SURE TO CONSULT THE NEXT SECTION (INTERIOR), SO THAT THE HOLE YOU DRILL WILL NOT BE COVERED
BY THE INTERNAL STRUCTURE OF THE STICK.
- At this point, you should have something looking like the example on the right. Use the wood putty to fill any imperfections
and gaps. Sand the wood using heavy grit, then a lighter grit (3600) before laying on the first layer of primer.
 When sanding, it's a good idea to use a small block of wood and glue on the sandpaper
to it if you don't have a sandpaper block. Sanding with a heavy grit is an easy way to shape the smaller angles. When sanding, it's a good idea to use a small block of wood and glue on the sandpaper
to it if you don't have a sandpaper block. Sanding with a heavy grit is an easy way to shape the smaller angles.
- Use flat paint (white for lighter colors, and black for darker colors) as a primer. Lay on the first coat thin.
Then spray on a slightly heavier second coat 15 minutes later. Sand the primer when it's dry before laying on the lacquer.
Give the lacquer about 10 days to cure (fully dry). If you get fingerprints on the paint, carefully try to
rub it out with your finger with light pressure for still tacky paint, and harder pressure for paint that is mostly cured.
The final product:
The final shape of your base is only bound by your imagination and patience.
|