Hardware
* Pushbuttons
This section details the materials needed and process to mount the pushbuttons to the plexiglass and base.
Materials Needed:
- A Power Drill
- Drill Bit- Skinnier sized
- Plexi-Glass (w/ template of layout)- Taken from steps in the Base section.
- 15/16" Wood spade- Used with the Power Drill to make a hole in the base to accomodate the stick.
- 1 1/8" Wood spade- Used with the Power Drill to make a hole to hold the pushbuttons.
- Pushbuttons- In this case, the pushbuttons that come with the VF4 set from Sanwa is used (OSBF-30.)
- Xacto Knife - ... or hobby knife.
Pushbutton Background
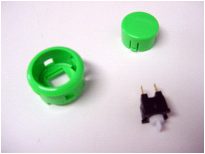 The pushbutton are made up of three major parts- the housing, the top, and the switch.
The housing holds the top and switch in place. It also has a mounting clip, which "grabs" material, in this case
plexiglass up to 3/16" thick. This is the reason the plexiglass thickness should be limited to 1/8".
 The top is the part you actually push on while playing.
Lastly, the switch, again, being Sanwa OSBF-30 is not a miro-switch, but actually just a regular momentary switch
(non-clicky). These switches have terminal sizes of 110, so buy receptacles
that are the correct size. The "30" in the Sanwa part number- "OSBF-30" is the standard size found on Jamma Japanese
arcade cabinets. A "24" would indicate a smaller size, while "40" would indicate a bigger size.
Steps:
- Take the plexiglass with the template still taped to the underside of it (from the Base/Interior section) and drill the
the rest of the pilot holes for the pushbuttons.
- Now use the 15/16" wood spade to cut a hole in the plexi for the opening of the joystick.
When using spades, use the spade to cut a hole in a phone book, then use the phonebook to rest the plexi on when you
are cutting holes in the plexi.
- Use the 1 1/8" wood spade for the holes for the pushbuttons on the plexi. This size is best for the OSBF-30 size
pushbuttons. This really should be a 1 3/16" spade, but
I have yet to find one of this size. A 1 1/4" spade will be too wide. The hole created by the 1 1/8 spade will be a littel
too small, so use the backside of an x-acto or hobby knife to score off the excess plexi. This will take about 5 minutes
of scoring per button, so be patient.
- Don't forget to cut the holes for your start and/or select buttons.
Use the 15/16" spade for "24" sized buttons that are mainly used for the start button on Jamma Japanese arcade cabinets.
- At this point, you are ready to mount the pushbuttons to the plexi, but first, make your underlay.
The final product: