|
|
|
Base
* Interior
This section details the materials needed and process to make the platform for the interior platfor of a custom
designed joystick.
Materials Needed:
- A finished exterior base- Check the previous base section for details.
- 3/4" x 3/4" wood stick- the width of the stick will ultimately be up to you. This wood will be used for
holding up the perimeter of the plexi, as well as support fo the center of the plexi. Ultimately, this will be used to hold
up the plexi on the base.
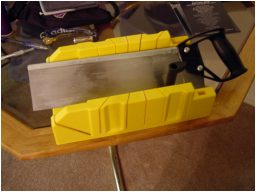 Miter Saw-
You can use a power miter saw, if you have one handy. If not, you can save money by buying a manual version
($5; picture to the right). The miter saw is used to make straight cuts, as well as angle cuts. Miter Saw-
You can use a power miter saw, if you have one handy. If not, you can save money by buying a manual version
($5; picture to the right). The miter saw is used to make straight cuts, as well as angle cuts.
- Wood Glue- This is self explanatory.
- Plexi Glass- This will determine the size of your base. A standard size is 11" x 14" and 1/8" thick.
I usually have the worker
at Home Depot cut this in half to 11" x 7". There are thicker sizes also, but if you are using a non-screwing type pushbutton,
such as the ones include with the Sanwa VF4 set, stick to 1/8" thickness, as the pushbuttons' clamps will not "grab" plexi
that is thicker. Sanwa does offer screwing type pushbuttons like those offered by Happ, if you want a thicker plexi, and
Sanwa pushbuttons. The size of the plexi will determine the size of the base. Slimming down plexi is hard work, and the
base will be built around the plexi for convenience. Ultimately, the size is up to you. Also, you can use a more durable,
but more expensive alternative- Lexan. Lexan is also used for R/C car bodies.
- Sandpaper- Used to shape and smooth the wood. Use a really heavy grit for shaping, and taking off the rough
edge on the cuts. Use smoother sandpaper before spraying on the paint.
- Square- Handy to make sure your base is built correctly.
- Comicbook Cardboard backing- Used for measurement purposes, but ultimately will be used to keep the underlay flat.
- 1 Sheet of Paper- Used for measurement purposes.
Steps:
- Depending on how you built your exterior, cut the 3/4" square stick according to the following diagrams and the size
of your external base.
Here's a visual example of how the first diagram would look.
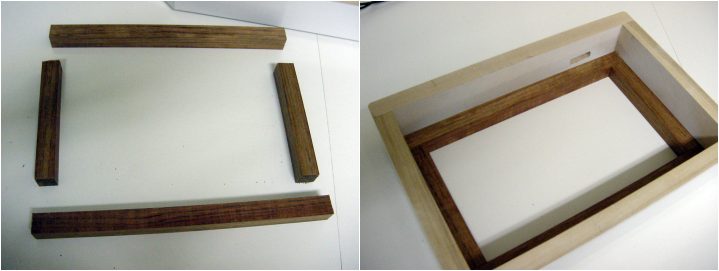
- Take your finsihed Exterior and lay it upside-down on a flat, even surface. Then arrange the cut 3/4" pieces,
using the second picture above for visual reference. Glue the 3/4" sticks together, BUT DO NOT GLUE THE STICKS TO THE EXTERNAL
BASE. Make sure glued sticks form a structure that will slip out of the external base easily. Mark what side will be
the bottom side of the new structure, as the opposite side should be flat, so that it will hold the plexi on it's
flat surface.
- Wait for the glue to dry inside the external base, then remove it. Do not screw these parts together, as the screws
from the diagrams in step 1 will hold them together, as well as hold them to the external.
-
The next step is dependant on the type of stick you have, and the layout of the pushbuttons.
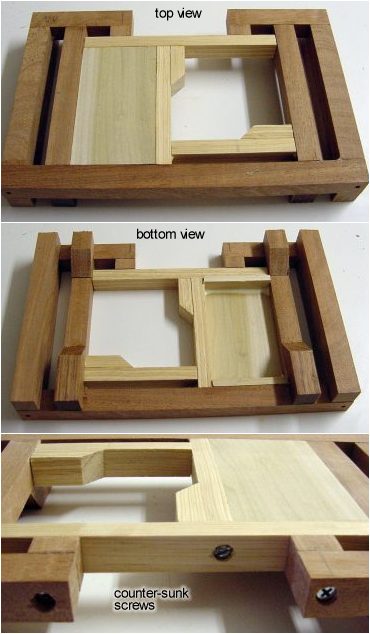
Build the framework according to the stick you have.
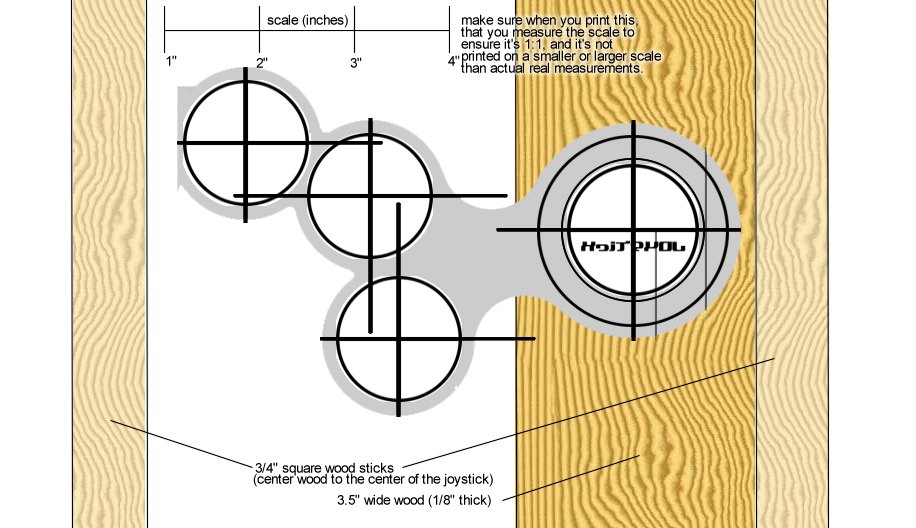
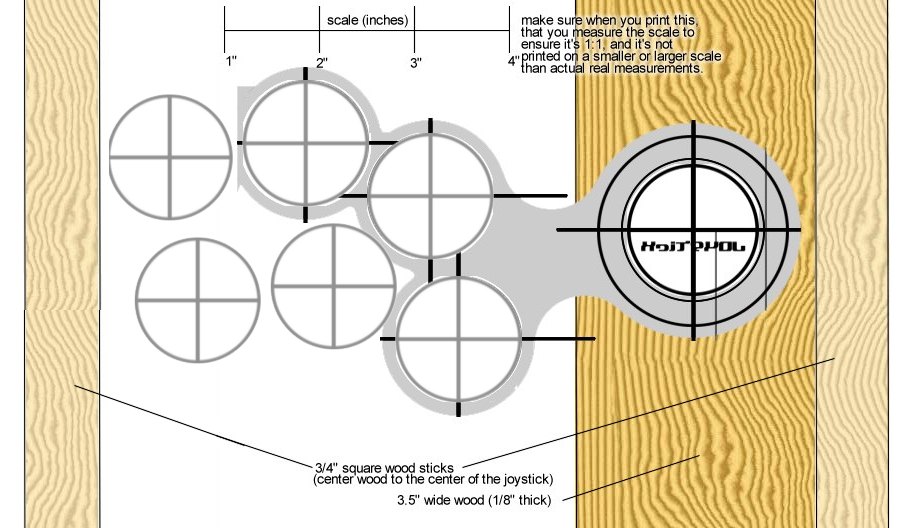
Here are some diagrams you may download as a guide for your frame, and layout locations for your pushbuttons and joystick.
The layout is according to the Japanese standard, and also for Sanwa's JLF series sticks (which includes the VF-4 set from Sanwa.)
The wood that the stick is screwed on to from the bottom side-up is a 2 1/2" wide, 1/8" thick poplar and can be found at
Home Depot. Make sure when you align this piece, that it's centered to the location of the stick. Also, the 3/4" square
sticks are used for more bracing. These pieces may be screwed together for more rigidity, but you will need to use
counter-sinking for the screws, so that the screw heads do not protrude. Visual pictures are below. You
will need to add more pieces for bracing like the examples that follow. Wood glue will suffice for these extra braces.
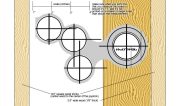
 Tip: Print out the layout you wish, and make sure the scale is 1:1; meaning that when it is printed, that when you measure
the scale on the prinout, that it is actually 1 inch. Tape this prinout to your plexiglass, and then build your frame
around this layout. Leave the prinout on the plexiglass for later. The layout images are reversed, because this is what
you will see from the bottom of the stick, so you are taping the layout to the underside of the plexiglass when all is said
and done. Also make sure to leave room for the other buttons such as the start and select!
Tip: Print out the layout you wish, and make sure the scale is 1:1; meaning that when it is printed, that when you measure
the scale on the prinout, that it is actually 1 inch. Tape this prinout to your plexiglass, and then build your frame
around this layout. Leave the prinout on the plexiglass for later. The layout images are reversed, because this is what
you will see from the bottom of the stick, so you are taping the layout to the underside of the plexiglass when all is said
and done. Also make sure to leave room for the other buttons such as the start and select!
Additionally, extra pieces of 3/4" square pieces were added so that the bottom covering piece of wood does not hit the
joystick and pushbuttons.

- When you are done with the frame, take your external base and again, turn it upside-down and lay it on a flat, even
surface. This time, put your plexglass with the layout facing up in the center of the external base.
Take the comic book backing cardboard, or equivalent,
and cut it to the size of the plexiglass. Lay the comic book backing on the plexi. Take the finsihed frame,
and lay it on the comic book backing, but this time, apply wood glue to where the frame contacts the external base. Be careful
not to get glue on the comic book backing and plexi.
This process ensures that the surface of the plexi will be even with the top of the base.
-
You can now refer back to step 1, and drill the holes for the screws that will further support the frame to the external
base. Use at least 2" long screws.
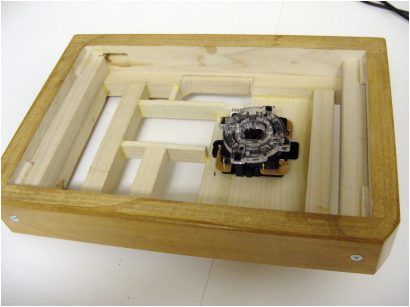
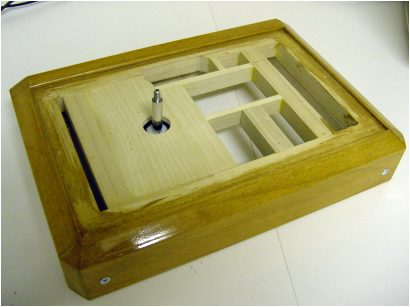
The final product:
Notice that the frame in this base has the 2 1/2" poplar not centered to the stick. In fact, I had to extend it over to
hold the joystick. The two other 3/4" square sticks are also uncentered. As you can tell, I've built enough to refine the
process.
|
|

|